Friday, November 16, 2012

So much happening at Stampin Up!


Hang on to your hats there is so much going on with Stampin’ Up, that I had to number them for you:

1.    Talking Tags – Personalize cards, invitations, gifts…..

2.    Make an Impressions  - Sizzix Texture Boutique Embossing Machine

3.    Online Extravaganza – Super savings November 19th – November 28th

1.   Talking Tags
With Talking Tag, you can send a gift that is uniquely you. Talking Tag is a message label you can attach to cards, invitations, gifts . . . anything! Personalize birthday cards, Christmas gifts or even record quick instructions for a project. Now your pictures really can say a thousand words!
How to Buy Talking Tags:
Buy 'em by the sheet! You get 10 tags for just $7.95 (item 129723).
How to record a voice message:
  1. Download the FREE TalkingTagT App on you smartphone from talkingtag.mobi, iTunes® or Google PlayT.
  2. Adhere the message tag to your card or gift.
  3. Open TalkingTagT App and scan the code.
  4. Record your message (recording starts immediately, so make sure you're ready!).

You will have the opportunity to listen, re-record, cancel, or confirm your message after you've completed recording it. Each label allows up to 60 seconds of a greeting, song, or product message.

To play the message, recipients will need to download the app and scan the code.  Messages are saved for two years, so they can listen to it over and over.

Watch the video:


2.   Make an Impressions  - Sizzix Texture Boutique Embossing Machine (so cute)
These are selling out quick and there is only a limited amount!
'Tis the season of giving, and the Texture Boutique makes a wonderful gift for anyone who wants to create their own elegant embossed art. To help you with your gift-giving needs, we're offering a special value bundle that saves you $5.90. If you prefer, you can also purchase the Texture Boutique alone. Looking for stocking stuffers? Pick up some additional embossing folders.

Texture Boutique Bundle
Item 132700
$39.95 (a $45.85 value)

Includes
•Texture Boutique Embossing Machine, 1 Pair of Standard Embossing Pads, 1 Mylar Shim
•Flower Garden Textured Impressions Embossing Folder-Stampin' Up! exclusive
•Stripes Textured Impressions Embossing Folder-Stampin' Up! exclusive

Texture Boutique Embossing Machine
Item 132657
$29.95
Includes
•Texture Boutique Embossing Machine, 1 pair of Standard Embossing Pads, 1 Mylar Shim

3.   Online Extravaganza – see attached flyer for more information
The Online Extravaganza promotion is our biggest online sale of the year! We want to make it easier for you to get sales during a time when lots of people are doing their holiday shopping, but not necessarily holding Stampin' Up! parties. So during these 10 days only, you and your customers can get incredible discounts-up to 50 percent-on some of your favorite products!

In addition, there will be three products 20 percent off for 24-hours only on both the first and last days of Online Extravaganza-our very own doorbusters! Woot! Woot!

All items can be ordered through my on-line Stampin’ Up website: http://www.stampinup.net/esuite/home/katpaws/  and will be shipped directly to you!


Tuesday, October 30, 2012

Monster Mash


Is this an army of green and black monsters?
No it is just my treat boxes filled with candy, that I made for my office staff. Which is good because some of these 'solders' are not in formation. I made some of them to look like Frankenstein and others like vampires.

I hope everyone enjoy them.
Happy Halloween!

Monday, October 29, 2012

October Cards


Triple Layer Gratitude Card

I have seen this style (triple layer) card used a lot recently and thought “oh that is tough to do”. Well, it turns out it is not and I love the effect. Once you cut all the layers of the vanilla stock you simply layer them on top of each other and then begin stamping the images. Before taking them apart, I ran all the layers through the Big Shot using the Perfect Polka Dots Impression embossing folder. I like the dimension and ‘funness’ (yes that is not a real word) of this impression folder. Okay back to the card, after running them through the Big Shot, you separate all the layers and then back them to the second layer color. I used More Mustard for the layer backing stock.  Once the backing color is adhered, I started layering them on the base stock (Chocolate Chip). On the second and third layer I added dimensional to ‘pop-it-up’ a little bit more. The ribbon used for this is Soft Suede,3/8” Taffeta Ribbon. The sentiment and images stamped are from the Day of Gratitude stamp set. This was a new set introduced last year and I was pleased to see it made its way into this year’s Annual Catalog. Colors used for this card were: Cajon Craze, More Mustard, Chocolate Chip and Certainly Celery.  Now that I know it’s an easy technique to do and that delivers such a ‘bang for your buck’, I think I will use it again.


Leaves, Happy Thanksgiving Card

This is pretty much a CASE (Copy And Share Everything) card from Mary Fish. I love the cleanness to this card while it incases the outdoors feeling of Fall. After I used the earth colors in the Gratitude card I wanted something a little crisper and I love the color combo of Rich Razzleberry, Lucky Limeade and Crisp White. I ran the white background stock through the Big Shot with the new Woodgrain Impressions embossing folder. Also used and ‘new’ is the Autumn Accent Bigz Die and coordinating Wonderfall stamp set.  I have found when these two are used together it can be tricky at first. I think that is because we have been so spoiled with SU! new Framelits where you stamp first and then die cut out second. With this combo it is easier (for me) to die cut out all my shapes and then stamp the image afterwards.  Using dimensionals, I layered the stamped leave images on top of the Woodgrain and then added a bow and button (both retired) at the stems. The greeting is from the Teeny Tiny Wishes stamp set and then uses the Word Window punch and the Bitty Banners Framelits layered together. I would say this is a Clean CASE.


Christmas Elf Shoes Card

Okay, now I am thinking do I ever think of my own cards?…..Yes, I know I do, but sometimes I love some that I have found from other talented stampers that I just have to CASE. This Elf Shoes card was from Becky of Inking Idaho (2011) and it was fun to start doing Christmas cards. Christmas seems so far away, but it is less than 2 months from now. I am sure we have a TON of things we are planning, doing and buying in the next 8 weeks…..yikes. The elf shoes are made by cutting a Top Note die in quarters and then using the Ornament and a 3/4 “ circle punch. Once cut/punched, I sponged the edges with black for some shading. The toes are 1/2” circles of the Red Glimmer paper. Bows are the Gumball Green Stitched Satin Ribbon and the legs are DSP. The greeting is from the Seasonal Saying stamp set. You can buy this stamp as a set or a single stamp until January 2nd.. Colors used for this card are Gumball Green, Cherry Cobbler and White.

Thanks for stopping by.

Sunday, October 28, 2012

Stampin' Up! is having a Spooktacular sale!


Yes, for one day only Stampin' Up! is having a Spooktacular sale!
Almost all stamps are 15% off!


BIG NEWS!! Stampin' Up! is doing a one-day Monday ONLY sale on almost all of our stamp sets!

INCLUDES:

  • Background Stamps
  • Personalized name stamps
  • Cookie Press Stamps
  • Single Stamps
DOES NOT INCLUDE:
  • Hostess Sets
  • Bundled Stamp Sets
  • Digital Stamp brush sets

So - check your catalogs . .. now is the time to order! You can place an online order through my Stampin' Up website (see below link) and click on the Stampin' Up box in the upper right corner, or let me know what you want, and I'll place one big order on Monday evening...

 
I am following this idea from my upline Janice and if orders total $150 or more, I will draw a name from all the orders for someone to receive the Hostess benefits!

Order directly:

 
Katrina Benny >^..^< SU Independent Demonstrator

Tuesday, October 2, 2012

October Schedule of events

Wow, October is going to be a Stamp’ede of fun events for me.

October 6th – Bella Vista High School Craft Fair Janice has participated in this Craft Fair off and on for five to six years.  This will be my third year ‘helping’ her – ha, I really just keep her company – but, I truly enjoy the day. This year we are changing it up a bit, so you will definitely want to see the ‘new’ booth. We will be inside the cafeteria again – which is great because rain or shine we will be protected! Make sure to stop by and say hello.
October 8th – Mojo Monday
Even though this is the month of Halloween, we will be moving on to Fall and Christmas projects.

October 13th – Saturday Scrappers (and my brother’s birthday)
As mentioned before, we are done with Summer pages and we will be creating Halloween and Fall pages. So, remember to take a lot of pictures of your favorite pumpkin, witch, or ghoul to fill your pages.

October 20th – Homemade Holiday Event
Janice and I will be teaming up again and hosting a Holiday Stampin’ event. We will be doing five projects based on the Stampin’ Up! Holiday Mini Catalog. One special project we will be doing is the Christmas Ornament on the front cover of the catalog. The cost for this event is only $25! It will be held at the Origin Coffee & Tea, in Rocklin, a non-profit coffee shop resolved to end human sex-trafficking. 

On a side note, a few more special days for me to celebrate in October are:
October 15th – my Wedding Anniversary and October 19th – Lauryn’s Birthday; both very special days in my life.

Oh, and then let’s not forget October 31st – Halloween!

I hope to see everyone come to at least one or all of these fun events!


Tuesday, September 11, 2012

This month’s Monday Mojo had it going on……


We had Daydreams, wonderful Windows and Ghouls complete with treats.
 
For the Friend card, we worked with a new (new to the group) simple technique of inking the Impressions Embossing Folder to achieve an antique effect to the paper. This technique is simple because all you do is ink up with your ink pad (used Baja Breeze) by patting it over one side of the embossing folder; place your paper in the folder, then running it through the Big Shot. You can change the look by having the ink on the convex or concave side of the paper by choosing which side of the folder you add your ink to. Note: this technique does not require a lot of inking; a little pat will do ya.

Next, we stamped various stamps in the “Daydream Medallion” set with Soft Suede and more Baja Breeze on the coordinating Very Vanilla, and yep, Baja Breeze card stock. Then we stamped the sentiment from the “Blessing from Heaven” stamp set. Okay, so you’re thinking simple card if it wasn’t for the cutting of the medallions and sentiment….Nope, we went back to the Big Shot and used the new Apothecary Accents and Floral Frames Framelits to cut out everything so nicely. What a time saver. Do you have these framelits? If not, you need them! Additionally, we added a little bit of the Victoria Crochet Trim ribbon and a cute little (retired) button to top it off. If you don’t have a button that matches, a Jumbo Pearl would go nicely instead.


Staying with new ‘simple’ techniques, the Cottage Window card uses the new “Cottage Window” Stamp set, Core’dinations Card Stock and Stampin’ Sanding System. Okay, here is what the Holiday mini catty says: “Core’dinations Card Stock, 80 lb. sandable card stock to create an antiqued, distressed, colorpopping look. Outside layers are exclusive Stampin’ Up!® colors—one side textured, one side smooth. Inside layer is a monochromatic color. Reveal inside layer by sanding, tearing, or distressing.” I used the wood grain embossing folder on the Early Espresso Core’dinations Card Stock, and then sanded the paper re-reveal the lighter (maybe Crumb Cake?) color beneath.

I stamped the window image with Versa Mark onto Watercolor Paper and embossed it with Early Espresso Stampin’ Powder (new mini catty). I wanted a thicker stock to coordinate with the Core’dinations card stock (wow that’s a lot of ‘core’ going on.) For the ‘outside the window’ image, this set comes with Pumpkins, three coordinating Branches and Birds, and other seasonal images. I chose the barer branch, pumpkin and spider. I then cut out the inside of the window image, raised it with Dimensional, and placed it over my ‘outside the window’ image for a 3-D effect. The extras on this card are: a little bit of Howlstooth & Scaringbone DSP, retired More Mustard ribbon, sentiment, and brad. Oh, and all of these are layered on Crumb Cake card stock.

Lastly, and the most Ghoulish and Googlie-eyed, we completed a couple of simple (not techniques) treats using the Ghoulish Googlies Bundle. It includes the Ghoulish Googlies Designer Kit and “Googly Ghouls” stamp set, again, in the new Holiday mini catty. Just look at what you get with this bundle: 20 2-sided printed tags, 50 googlie-eyes (so fun!), 10 treat bags, baker’s twine, plus the coordinating “Googly Ghouls” stamp set.

I also embossed the treat bags with the Spider Web embossing folder (big catty), stamped a spider image on the tag, tied it with the baker’s twine, adhered it to the bag, and filled it with candy. Spooky simple!

Since the kit comes with 10 additional preprinted tags, I made this cute little “matchbook” treat cover with the extras and some (again coordinating) Howlstooth & Scaringbone DSP. Ghoulishly sweet and simple!


Thank you friend, for stopping bye, looking through my window, with your own googlie eyes.

Sunday, September 9, 2012

The end of Summer...


…well, at least for Scrapbooking Pages.
My Saturday Scrappers’ had asked for a couple sets of themed pages; one Bar-B-Que set and the other set for more pictures of her grandchildren.

For the Bar-B-Que pages, I used an old 1998 Stampin’ Up! set “BBQ Fun” I had around. I thought it was odd I hadn’t sold it at the last Craft Garage Sale – but things happen for a reason. Does everyone remember when Stampin’ Up! put the year the stamp was released on the labels? I kind of miss that.  I layered this set with the current “Comfort Café” DSP, a red checkered paper (to emulate a table cloth) and still a favorite of mine, the retired brown striped ribbon. All layers are on “Crumb Cake” card stock. I love how the Comfort Café stock can be a bit outdoor country for these pages.
 
The second set of pages was my last bit of color of summer. I used the retired “Berry Blossom” DSP and the current “Fruits and Flowers” stamp set. Again, just talking (blogging) out loud, I wish SU! would keep the DSP stock around for 2 years. There are some that I could use over and over…..oh well. I bet you are wondering on the second page why there are some blank spots where there should be DSP??? Well I had left them open for pictures to go into those spot.  
 

Next month will be Halloween and Fall pages. I have some great ideas “brewing”…
Thanks for stopping by, look for my Mojo Monday post next.


Thursday, August 30, 2012

'Bat'astic News.......


Bat-astic News…..


Stampin’ up has extended this promotion through September 16th!
 
 
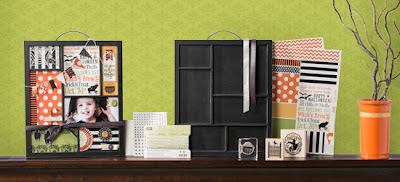
Don’t miss out on this Spooktacular offer from Stampin’ Up! When you join my Stampin’ Up team, not only will you get $125 worth of Stampin’ Up products (of your choice) for only $99 (plus FREE shipping on your starter kit) but, all new demonstrators will receive a FREE Howl-o-ween Printer’s Tray project kit!  This boo-tiful kit contains all the bits and pieces to create a super spooky Halloween decoration—you won’t want to miss out on this exclusive offer!

Click here to join, then click JOIN THE FUN on the top right - remember… join before August 31st to receive this awesome Halloween kit!


Tuesday, August 28, 2012

Last days for Spooktacular Kit Offer!


Don’t miss out on this Spooktacular offer from Stampin’ Up! It fly’s away, like a witch on a broom this Friday night. When you join my Stampin’ Up team, not only will you get $125 worth of Stampin’ Up products (of your choice) for only $99 (plus FREE shipping on your starter kit) but, all new demonstrators will receive a FREE Howl-o-ween Printer’s Tray project kit!  This boo-tiful kit contains all the bits and pieces to create a super spooky Halloween decoration—you won’t want to miss out on this exclusive offer!


Click here to join, then click JOIN THE FUN on the top right - remember… join before August 31st to receive this awesome Halloween kit!


Wednesday, August 15, 2012

August Group Projects ~


Mojo Monday & Saturday Scrappers
Friend
This card is CASE from Convention, as it was one of our Make & Takes using the Affection Collection stamp set. I did change the color palate slightly. I really like this stamp set and I am sure I will use it again come Valentine’s Day.  

Frightening Feline
Okay, please tell me what is so “frightening” about this Feline? If you ask me she (cause I am thinking all ‘Kats’ are she’s) is pretty darn dazzling with her Rhinestone collar and eyes! She was stamped and embossed with Tangerine Tango ink and powder and yes with the new firm foam pads you can emboss without using VersaMark ink.
She is sitting on top of a ‘wall’ of Howlstooth & Scaringbone DSP (who comes up with these names – I don’t know, but would love that job), and a piece of black 1/8” Taffeta ribbon. The moon behind her is old retired SU paper, but I loved the color of it – it reminded me of a Harvest Moon.
 
If you like this Halloween card, then don’t forget to check out the great Stampin’ Up! Halloween special going on this month when you join my SU team.  For the cost of $99 you will not only get $125 worth of Stampin’ Up! Products, and the additional Business Pack, but you will get the Spooktacular Halloween tray FREE! Click on Join My Team below.  
Happy Birthday Elephant
This is another card inspired by a Make & Take project from Convention as well, but completely different, hehehe.
I just LOVE him! So impressive in size, but fun and whimsical with his Birthday Hat. How cute is he? Okay, yes, the elephant is a he and the cat was a she….that is just how I call them.
I saw this technique of the mirror image from another SU demonstrator and loved it. Its really was simple. You use a piece of window sheet to stamp on and then transfer it to your already stamped image.  I also used to make this card is the World Spectacular DSP, the ever so popular Paper Piercing Tool, Mat, and Essentials Pack. Then cut out with coordinating Apothecary Accents Framelits. The base card stock is Cherry Cobbler with Island Indigo alongside the DSP.
Saturday Scrappers

My theme this month for Saturday Scrappers was summer inspired. Remember, for scrapbook pages you typically do them AFTER the event once you have your pictures. For cards, you need to do them BEFORE the event so you can mail them to your peeps.
So, I did Fourth of July and Summer Fun pages. I used Real Red and Pacific Point for the 4th of July pages – I like how the blue pops a little bit more. Along with the base color, I used First Edition Specialty and Polka Dot Parade DSP.


Staying with the bright colors for my Summer Fun page, I used Daffodil Delight (can’t get much brighter), with Rich Razzleberry, Pumpkin Pie, Old Olive, and more Pacific Point. The DSP is again Polka Dot Parade with a strip of Summer Smooches. I can see fun in the sun pictures added to your pages that will represent your summer fun!


Thanks for stopping by.

Monday, August 6, 2012

New Kat Stamp Club starting in September!

Are you a Stamping, Paper Crafting, Creative person? 

Would you like to get together with other creative people?

Would you like to receive FREE Stampin’ Up! Products?

I am looking for at least six (6) stampers to join my new Kat Stamp Club starting in September!

We will meet every other month (September, November, January, March, May, & June); on either the second Tuesday or Wednesday of the month at 6:00 PM, in the Lincoln (CA) area.
 
You will receive a FREE Stampin’ Up! Annual and Holiday Mini Catalog, plus we will complete 3 cards or projects at each club meeting. 

On your “Hostess” month, you also reap the Hostess Benefits of the orders in the club, plus any outside orders you may have collected to bring your total up. (Option: The more orders you collect, the more freebies you receive!) With six (6) in the Kat Stamp club, you will receive at least $25 in FREE Stampin’ Up products on your Hostess month! This is a great way to collect Stampin’ Up! stamp sets and supplies in a gradual way, gain hostess benefits without having to HOST a party (invite guests, clean your bathrooms, separate orders, etc.)
Your cost to join the club would be a $25 minimum stamping order, per club meeting.

If you are interested, or know of someone that is interested, email me at:
 
Re: Kat Stamp Club

Tuesday, July 31, 2012

2012 Stampin' Up! Convention Goodie Bag!

Remember when you went to birthday parties as a kid and you loved playing games, eating cake and ice cream, watching the guest of honor open their presents (you wanted them to open yours first). Then when everything was done and you were leaving, you got the GOODIE BAG!

Well, it’s like that at Stampin’ Up! Convention, but you get your goodie bag at the beginning of the party!!!

First off we got this fun, hip and ultra-cool chevron (all the rage now) patterned bag.  


It was filled with not one (1), not two (2) but THREE (3) new stamp sets, the cute workbook with all the class schedules and ample space to write notes in, a writing pen (for us baby boomers), a Stampin’ Up! i am… Convention 2012 pin, and a glue stick. Plus, they kept giving us more items to fill up our bag!


I ended up coming home with a total of seven (7) new stamp sets, a package of Storytime DSP (Convention 1st timer), the new Festive Paper-Piercing Pack with mat and tool (Prize Patrol), three complete sets for the Make and Takes including paper, a roll of ribbon, set of rhinestones and package of Dahlia’s.

 
This is the BEST goodie bag I have ever received!

If you too, would like to go to Stampin’ Up! Convention 2013 with me and experience the party of a lifetime (BIG 25th Anniversary year!) please join my team. Remember, if you sign up to be a demonstrator in August, in addition to the wonderful Stampin’ Up! products and business starter kit you get the Spooktacular Printer’s Tray Kit for FREE!

Thanks for stopping by.

Monday, July 30, 2012

Spooktacular Kit Offer for New Demonstrators in August!


Yes, you read that right! I’ve got a Spooktacular offer for you during the month of August. If you would like to join my Stampin’ Up team, not only will you get $125 worth of Stampin’ Up products (of your choice) for only $99 (plus FREE shipping on your starter kit) but, all new demonstrators will receive a FREE Howl-o-ween Printer’s Tray project kit!
This boo-tiful kit contains all the bits and pieces to create a super spooky Halloween decoration*—you won’t want to miss out on this exclusive offer!

Click here to join, then click JOIN THE FUN on the top right - remember… join between August 1st and August 31st to receive the awesome Halloween kit!
Make this darling shadowbox frame with your FREE kit!
Let me tell you more about Stampin' Up - my upline family (Rockin' Stampers) and the fun you will have! 

(*except the ink)

Saturday, July 28, 2012

Stamping Up 2012 Convention ~ Photo Op

Okay how sweet is this ~ Shelli took the time every day to meet with us, sign our workbooks and to really talk to us. You just don't see that with many CEO's of large companies ~ but she does and she couldn't be sweeter and down to earth. I felt like a star-struck teeny bopper, but she put me at ease. This is a company that I want to be with and i am.....


And her daughter is just as kind and beautiful ~ inside and out! 


Friday, July 27, 2012

#Convention2012 ~ 2012 Convention Stampin' Up Classes


2012 Stampin' Up Convention i am...
#Convention2012 – Bonnie Thurber – I am Doing Business “My Way” - my first class at the 2012 Stampin' Up Convention - gave me some great recipes ideas for me to try!

#Convention2012 – Pam Morgan– I am Making Money - inspired me to talk with the Career Center here at convention to reset my path with SU and get me more bonuses.

#Convention2012 – Carrie Cudney – I am Open for Business - Who knew fishing could be a relatable topic for Stampin' Up, but Carrie did it.

#Convention2012 – Emily Montoya – I am Starting Out – more career plan information for Stampin’ Up – played some games and won a roll of ribbon – thank you Emily!

#Convention2012 –Donna Griffith – I am Savvy – Wow these project ideas were so great can’t wait to use them at my next workshop!
#Convention2012 – Brian Pilling – I am a Leader - I only have one down line so far but I plan to grow and be a great leader.
#Convention2012 - Jill Leigh - I am a First-Time Recruiter - Delightful!
Want to find out more about Stampin' Up and go to Convention 2013? Leave me a comment and I will show you how!

Exciting things are happening in August you don't want to miss out! (sneak peek)


Sunday, July 15, 2012

Stampin' Up Convention or Bust!

About a year ago when other friends and SU demonstrators returned from last year’s convention…..no, I take that back, it was when they were at convention and I got a glimpse of the excitement from their photos and Facebook postings that I decided I was going to convention the next year.  I started saving for the trip by putting away a little bit of cash each month in a special ‘travel’ savings account plus, as time grew nearer, I would put my earnings from groups in that account. Janice, my upline, said that she was ready to return to convention this year, too. So we started making plans to drive together and share a room to save on costs.
It was all said and done until April 17th when the excitement started to rise within me.  I completed my on-line registration and signed up for the classes and make-and-takes. Now, we knew the names of the stamp sets we would be getting, but had no idea what they looked like until the new annual and mini holiday catalogs were unveiled. So I waited again.
In the meantime, I wanted to know everything about convention, what do we pack, what type of clothing we should wear, what type of bag should I bring (roller, backpack, messenger, use the one SU will provide), how many swaps should I make, should I sign up for certain swaps or just go it alone and try and swap with everyone…..my mind raced. I knew I wanted to do something nice for Janice my roomie. What would be a nice gift for her? Well the information was wonderful from the SU Connections site, SUDSOL message posts and from my friends that had been there before. All the SU demonstrators are so kind and sharing of ideas (thank you). I did find the perfect bag to use at convention. It is a cross between a messenger bag and tote. It will be great on my shoulder, yet free to get swaps in and out of.
The new catalog came out and we saw the stamp sets we would be receiving. Then more convention talk stirred. I signed up for the SUDSOL Fronts Only swaps as I heard the best swaps were from SUDSOL. Well, that had me concern, too. Will my swaps be good enough? I turned to Janice for advice and she mentored me and gave me her stamp of approval on my swap.
Janice found a posting for “Roomies Wanted” for convention week; we checked into it and signed up. There will be 9 ladies sharing a house in SLC and, through email and Facebook; I now have 7 new friends that I will be meeting shortly. We seem to be all around the same age, spirit for life and stamping. Some are in the same classes and SUDSOL swaps and even one roomie is from the Sacramento area. Janice and I will be driving from Lincoln/Roseville to meet up with others in Reno before we make the loooooonnnng drive from there across to Utah.
Oh, SU had opened up a contest for a video commercial of Convention 2012, which I submitted an entry. Click here to see that submission: http://www.youtube.com/watch?v=uqTcaVg3XOs
Yes, I am that excited about convention as I am in the video.  
I did complete my SUDSOL swaps, my 12 x 12 double page swaps and then about 75 additional swaps for the ones I will encounter at the many different venues at convention. I think my kitty BonBon is wanting me to pack her up with my swaps.

This past weekend I have been finishing up everything, making roomie gifts, packing, and feeling like it is Christmas Eve. You know when you have a ton of things to do at the last minute, but can’t wait for the morning to be here to see the excitement on your families face. That’s me right now. The boys washed the car today, Dave filled the tank and everything,  except for the items I need in the morning, is packed and ready to go.  

Salt Lake City and Stampin Up here I come…………

Mojo Monday - July

Wow, what a whirl wind of a week this has been, but I am determined to post today before leaving for SU Convention (more of that topic later). I can’t believe that it is Sunday night and I did not get around to posting these cards sooner.
The first card we did used the Moving Forward stamp set. It has three main stamps:  a helium balloon, a trike and sailboat, and a really cute little bird and frog. This card also uses the new Polka Dot Parade DSP.  The clouds were made by using the frosting portion of the Cupcake Builder punch and the waves were created by using the Adorning Accents Edgelits.  I think what is so wonderful is that with every purchase of the Moving Forward stamp set Stampin’ Up donates  $3 to the Ronald McDonald House Charities (RMHC). So far SU has contributed over $1,000,000 to RMHC. I think its so great that we get to create fun cards and support a charity at the same time.  

The next card I knew I wanted to use the Fabulous You stamp set when I first saw it in the new Annual Catalog. The real bummer thing is, I can’t seem to take good pictures yet with my camera (one of my convention roomies are going to help me next week). The card shimmers, glitters and has bling going on.  I surprised myself, too with how much I enjoyed creating such a blingy card (am I becoming a girlie, girl???). I can only think of Cinderella that would have this shoe in her closet.
 What does not show up is the silver embossing of the shoe and sentiments, the sparkles of the Glimmer Paper (used for the side strip) and the embellishment on top of the shoe.  Other embellishments used for this card were the Apothecary Accent Framelits and the NEW Paper Piercing templates – okay, those two new items are great to use and so much fun!


The last cards were made from this month’s special – Reason to Smile stamp set. If you purchase $50 worth of SU product you can buy this set for $5 – such a deal! I cannot take credit for designing this card as I CASE it from my upline Janice, so kudos go out to her. I used the new 2012-2014 In-Colors Gumball Green and Primrose Petals for the coordinating paper and ribbon. I have to admit my favorite of these two color combos was the green and I would not consider myself a green gal. Oh, also used on this stamp are the new Dahlias a new accent to add to a project.  If you would like to purchase this set – don’t worry you still can. It is available until the end of July. You can access my on-line ordering with SU through my blog and you too will have a Reason to Smile!

Okay that is it for this post – I need to finish up for convention. Thanks for stopping by.