Sunday, January 22, 2017

New Year - New Catalogs!

Oh how I love this time of the year with Stampin’ Up! When the weather outside is frightful and the letdown of the holiday being over happens, we get to celebrate with a new Occasions catalog. If that is not enough, then the Sale-A-Bration (SAB) catalog is here too! The Occasions catalog are full of wonderful stamps to celebrate the next seasons; Valentine’s Day, Easter, Mother’s and Father’s Day, as well as birthdays, weddings, and babies! Plus, with the SAB catalog, its whole purpose is FREE items, yes FREE! With every $50 purchase, you get to choose 1 free item. All of the cards featured in today’s post are from either the Occasions and/or SAB catalog….so, let’s take a look.


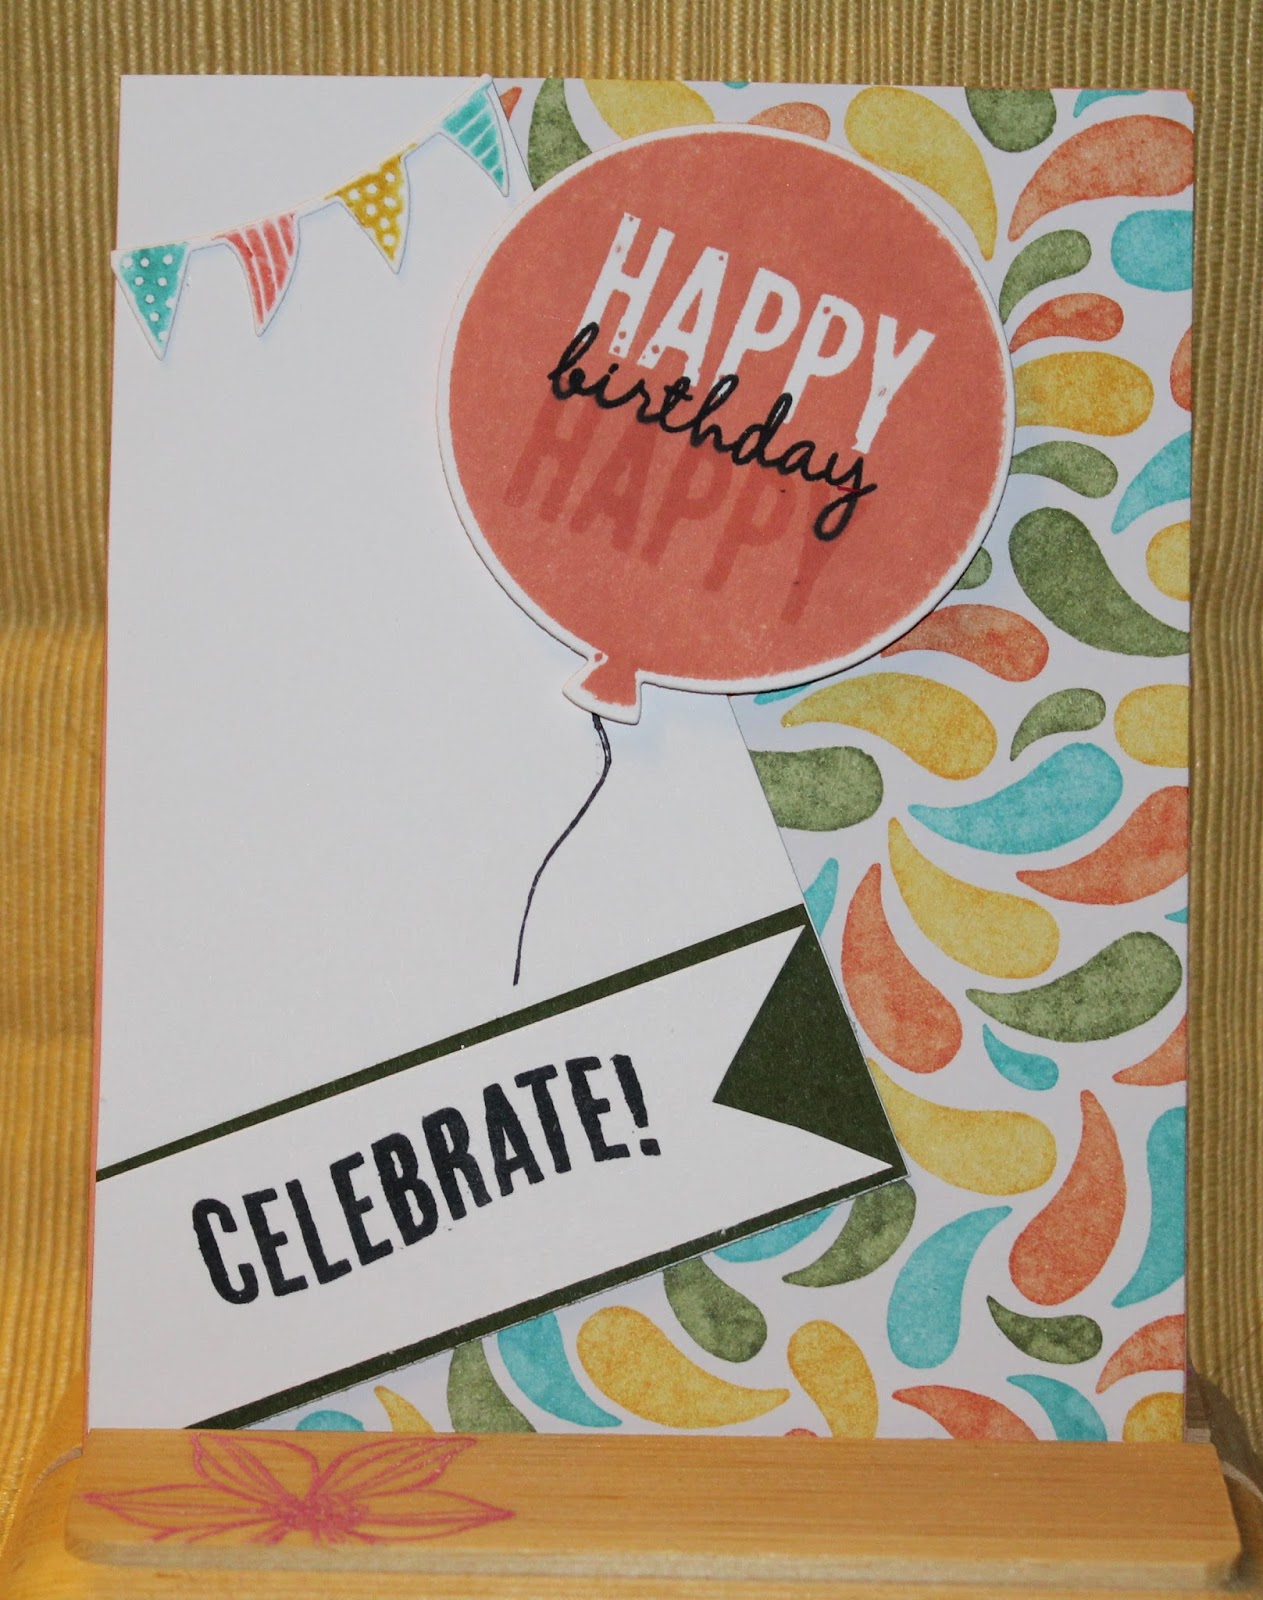
The first card is using Lift me Up Bundle, which means the stamp set and die cuts can be purchased together at a discount. Along with the bundle, I used the Carried Away Designer Series Paper (DSP), free from the SAB catalog. Oh, almost forgot, I used the Swirly Scribbles thinlets to create “the “wind” that is blowing the hot air balloon. This set comes with varies sentiments that you can use for birthdays, congratulations, love, or just sending a note. A very versatile set.  


Next, this card uses items from the Falling in Love Suite, the Falling for You stamp set, Falling in Love DSP (Occasions), Lace Doilies, Falling in Love embellishments and a free SAB set Delicate Details. I just love the DSP in this set. I can see it used for romantic, thank you, and baby cards They are really pretty papers. Again, this set comes with sentiments for weddings, anniversary and Valentine’s Day. 


Okay, the last card uses the ever so popular Hey, Chick set from the SAB catalog. OMG, this set of only 4 stamps has really gone crazy. I hope that SU carries it over into the Annual Catalog. For the background of the “fence” or chicken wire, I used the Timeless Textures set out of the annual catalog. We were joking at my stamping group that because the chicken and the egg are in front of the fence these are free-range chickens. To achieve the image “in front” of the fence or on the inside of the card in front of the other chicken, I used the masking technique. This is where you stamp the image on the paper as well as another image, say on a post-it note. You cut out the image on the post-it note and place it over the stamped image on your paper. After you have “masked” off the image, you then stamp over the image with another stamp to accomplish the look shown on this card. This is a simple technique that can be used for many different effects. Again, such a cute set, I see why it is popular.  


Well, there you have it. My first cards of the new year. Oh, speaking of the new year, this is the year of the Rooster for the Chinese New Year. How fun would it be to use the Hey, Chick set to create some cards to celebrate?

I will be posting more cards soon that were created by me and other talented SU enthusiasts. Until then, if you wish to order any of these or other products from these catalogs let me know or you can click on the Stampin’ Up logo on the right hand side of my blog page and order directly.  
Thanks for stopping by and have a great day!

Wednesday, December 28, 2016

As 2016 comes to an end!


It always gives us a chance to reflect, remember and look forward to a new year.

When I take the time to reflect and remember, I have to hope that I had done “better” this last year. Better with my own family and health, faith, finances, friends, work, and of course, with my stamping “business”.  

I know each year I say I am going to focus more on my blog, but this is an area that always seems to cause me anguish. I’m not going to spend a great deal of time pondering over it. In fact with this post, I will have posted one more post than I did in 2015…..so I did “better” and that makes me happy.

Now, back to my cards and this post….the cards below were from my November group. With just using two stamp sets from the Holiday Catalog; Mountain Adventure and Christmas Magic, we made three cards.


Snowman For this card, I used the trees and snowman from the Christmas Magic set and the sentiment is from Mountain Adventure. I thought it was appropriate because the snowman has mittens on his branch arms. The colors used were Marina Mist, white and black and yes the ribbon is retired but it was just the right touch.


Bells A simple card to make, but packs a punch. Both the bells and sentiment are from the Christmas Magic set. The bells were hand colored and “fussy cut” Then I used Wink of Stella to give them a bit of sparkle (hard to see in the photo). I used the Decorative Label punch for the sentiment and colored the rhinestones with cherry cobbler markers. The DSP is This Christmas Specialty found in the Annual Catalog and was carried over from the 2015 Holiday Catalog. The next layer is Cherry Cobbler card stock cut out by using an old favorite of mine Top Note. Again a retired die, but I still love it.


Mountain Scene This set is so fun and brings back memories of days when I too hit the slopes....many, many moons ago. I am thankful that I live in Northern California where I don’t have to live in the snow, but it is only an hour and half away. I used the technique noted in the catalog of placing the skis and snowboard on the same clear block to stamp the side image of the card. For the main area of the card, I used the various stamps to make a mountain scene. The mountains have more Wink of Stella added to them again hard to see in the picture. This set is fun because you can add more to your own outdoor scene with the stamps. 


Additional cards and projects
Below are some from my last swap and other cards I have recently done. I won’t go into great detail for them but thought I would share.  


Here are cards from my annual trip to Oregon, aka Girlfriend Weekend. I thought it was fun that many of us chose to do Christmas cards this year. I love this weekend.


 Over the Top 
This group is run by Janice Rosenthal-Rock of Bella Cosa Vintage. So I cannot take credit for the cards, but love the ladies in this group and the cards that we create or recreate.

https://www.facebook.com/vintagebellacosa/ or http://bellacosavintage.com/blog/


Note and Calendar pads I made these note/calendar pads for my office peers. You can’t see the calendars, but they are under the image flap. These were fun to make and were appreciated by all at the office.


So, let me wrap up this year with this last bit of information. The year 2016 is coming to an end. Take some time to reflect, remember and most of all look forward to 2017. I would like to think that we won’t have any pain or sorrow, but that probably won’t be. We can, however, overcome and grow from them and look forward to all the good times that are ahead for us. Please be safe and joyful in the next year and of course come back and check my posts.


Happy New Year! 

Sunday, September 11, 2016

The New Holiday Catalog!

So, the new Stampin’ Up! Holiday Catalog has been live since the first of September and I have to admit I loved it from the very beginning.

Halloween
Some of you know how much I (and my family) love Halloween and when I saw the Jar of Haunt stamp set, I knew I had to have it.

Creating this card was such fun. I started with stamping and die cutting out a large and medium sized jar (you get both of these jars in the coordinating Jar of Love, stamp set and Framelit bundle, in the Annual Catalog).  I then stamped the candy corn in one jar and floating eyes, and slime in the other. To complete the look, I colored in both of these with SU markers which were very easy to do.

For the banner, I punched out a hole and sponged on the top white banner with Daffodil Delight and Crushed Curry to make a glowing moon. Then I stamped the fun sentiment over the moon.

My final accent was to stamp a trail of spiders with a few of them enjoying the candy corn.


The inside has another stamped spider hanging from the top and one last sentiment in the bottom corner.  Such a fun set. 


Here is another card I made for a swap that uses this set too. 


Thanksgiving
Okay, I didn’t use any of the current stamp sets for a Thanksgiving card. I choose to use 2 sets from the annual catalog; Thoughts and Prayers and Me = Grateful.

However, there is something new from the Holiday Catalog I did use for this card. It is the new Decorative Masks. You get 4 different masks in the set. I used the one that resembled the leaves on the tree. Additionally, I used the new Sponge Brayer (annual catalog) to color the mask. I have to admit the new sponge brayers are so much nicer than previous rubber ones.

For both sentiments, I used only a portion of the saying from Me = Grateful.  You may ask how you only use part of a stamp? By “inking” them with a SU marker, use the brush side of a marker and just ink up what you want to stamp. When you use this technique, don’t forget to “huff” on your stamp before stamping so the ink is moist. 


Christmas
Lastly, a Christmas Moose! When the demonstrators first saw this stamp set, some said it was a reindeer and others said Moose. I knew it was a moose. Again, some of you know my love and collection of Christmas Moose. This set, Jolly Friends, comes in a bundle with the stamps and matching punch for the hats.

Yes, I would have loved to have a punch or die for the moose, but I love him so much that I was okay with fussy cutting him out.

The bottom layer of white cardstock is embossed with the new Cable Knit Embossing. Look a little closer and you will see the image of a cozy sweater.  Layered on the white is the new Real Red Stitched Edge Ribbon, so sharp!

I then used the Lots of Labels Framelits to layer real red and white cardstock. On top of that is the Christmas Moose. Cut out and on top of him is one of the three styles of hats you get with the set.

The sentiment Christmas and the holly are from the Hostess set Time of the Year; which uses the Bunch of Banners Framelits. For the inside sentiment I used Suite Sayings from the holiday catalog. I chose this sentiment because I thought it went with the comfy sweater embossment. 


Thanks for stopping by and taking a look. My next class will be November 1st, let me know if you would like to attend. Or maybe you would like your own copy of the new Holiday Catalog, or just need to place an order. 

Sunday, July 24, 2016

Hope your day goes SWIMMINGLY!

I was drawn to this stamp set Seaside Shore and it’s matching DSP with the release of the new Annual Catalog. Okay let’s be honest, I was drawn to a bunch of new stamp sets in new catty, but I will be show casing two new sets this month and one all-time favorite.

I started by using Mint Macaron as my base card and then layered with Dapper Denim and white. For the white card stock, I used the Softly Falling embossing folder to give the impression of bubbles. Then, I enhanced it with Pool Party and Calypso Coral inks with the actual bubble and starfish stamps included in the set. I layered a bit of the DSP across the “bubbles” and wrapped it with, dare I say it, retired brown sugar thick bakers twine (gasp).  Using the Lots of Labels Framelits, I precut out stock for the saying and seaweed, and then backed it with more Dapper Denim card stock for a bit of a pop of color. Lastly, I stamped (and hand cut) the fish at the bottom. (FYI – I doubled up dimensionals on the bottom fin because of the other layers). 


For my next card, I was again drawn to another new stamp set Foxy Friends and it coordinating DSP, plus punch. I wanted to incorporate this folding technique. I am sure you have seen this fold making the rounds recently and I knew I wanted to jump on that band wagon.

This folding technique might look difficult, but in the end it folds up to a regular 4.25” x 5.5” size card. Here are the dimension for cutting and scoring:  Card: cut 4.25“ x 11”, Strip: 1.25” x 11”. Score both at 2.75” and 5.5”. When you assemble your strip to the card you will “flip” the folds and attach the 5.5” scored strip to the 2.75” scored panel and the 2.75” strip to the end of the 5.5” panel.


I layered the panels with DSP and stamped the foxes in Calypso Coral and Smokey Slate. I had to cut out by hand all of the grey foxes and used the punch for the coral foxes. Tip for saving paper for SU punches like this one: punch out all of the pieces first, and then use that piece as a template for stamping the images. This way you can just punch out all the pieces in one swoop….okay I found this tip way after I stamped and punched them out, wasting a ton of paper…..there is always next time. 

Here is the link to watch that explains it better: https://www.youtube.com/watch?v=p7Mko55D7ZI Note to self – check out YouTube first for great tips and advice. 


Here are a couple more samples of cards using the Seashore and Foxy Friends stamp sets.

My last card uses the Lovely as a Tree stamp set. I, like many other demonstrators, hope that SU will uphold Shelli’s statement and never retire this set as it is a classic and so versatile.  I knew I wanted to use this set and this reflection technique and, if I don’t say so myself, I am pleased how it turned out.

The base stock and ink color for the reflection is Bermuda Bay. Then layer with white and Chocolate Chip. Okay, on to the stamping technique, I hope I can easily explain this.

  •         Stamp the first image of the trees (Chocolate Chip) on the top portion of the white card stock;
  •          Then stamp the image of the trees on an appropriate size piece of our Window Sheets. You will want to line it up with the tree trunks with allowing for some space in-between for the land;
  •          Tricky part, lift the stamped window sheet and flip it over and place it upside down of the previously stamped image.
  •          Using the window sheet as your stamp – stamp it and gently rub the image. Be careful not to move the window sheet  so the image doesn’t smear;
  •          Then with using a couple of masks for the land and reflection I used Wild Wasabi and Bermuda Bay for the land and water. I sponged the area until I was happy with the color. I used Soft Sky and a sponge for the sky area.  


I hope these steps make sense. Afterwards I stamped a sentiment on the white layer and there you have it. 


Thank you again for stopping by and I hope your day goes swimmingly!


My next workshop techniques will be about Color! 
If you would like to come to my next workshop or wish to order any of the above stamping items, please email me: katstampfever@surewest.net


Tuesday, May 31, 2016

The NEW Catty is Here ~ The NEW Catty is Here!

Okay, I admit it has been forever and a day since I have posted to my blog....truth be told I am not a good blogger. There I said it. I always have good intentions and I have even taken pictures of the cards I have done this past year, but sitting down in front of the computer and actually posting them is that step that I haven't been able to complete. 

Yes, this past year has been different for me, on the 25th of this month it will be one year since my mom has passed. And even though my mom and I have seen things different for so MANY years, the death of a parent is still hard......okay this is not what I set out to post today (hence the title of this post had nothing to do with what I am going on about). 

On to NEW and exciting things - The NEW Catty is Here, The NEW Catty is Here! I do look forward to sharing the new Stampin' Up Catalog with my "peeps" each year and this year is no exception. 

I have planned a small get together tonight (I figure you are reading this in the morning) and I hope you all will get as much enjoyment from the new catalog as I have. There are many favorite stamps that carried over from the Occasional Catalog that I think you will be thrilled about and many new items too. 

Okay, enough said. If you would like your own 2016-2017 Catalog leave me a message and I will get one to you right away! 

If you want to place on order - click on the SU logo on the right hand side and it will direct you to my SU website. 

If you want the join in my excitement - click on the "Join My Team" on the right hand side and you too will know the joy of previewing the new catalog and sharing your love of stamping. 

Thanks for stopping by,

Katrina

Tuesday, March 24, 2015

Blooming and Blendabilities!

I wanted this workshop to be a “blend” of blooming projects and a fun time using the Blendabilities. Little did I know Stampin’ Up! was going to discontinue the Blendabilities the same week of my workshop. Oh well, my projects were already planned and my markers worked fine.


The first project used the Happy Easter Bunny stamp [#137152 Occasions Catalog (OC)], the new Takeout Boxes (#135827 OC); [I hope these boxes make it into the next Annual Catalog (AC)], the Label Collection Framelits (#125598 AC), and of course various Blendabilities. I think this dancing bunny is  loving the idea of Spring and celebrating with friends and family. 
For the next projects I wanted to use the Sale-a-Bration (SAB), A Happy Thing stamp set (#139134 SAB).  I wanted to do a simple card and then a more elaborate card using the Blendabilities. After finding 2 examples of what I was looking for, I decided on the cards shown below.  Starting with the one on the right (simple) this was just a matter of layering cardstock and the stamp image of the single lemon.

The one on the left however was a little more in-depth, but my stampers were up to the challenge. First off, to get the bunch of lemons, we used the technique of stamping and masking off. (See the picture below with the masked off lemons) 

This technique is quite simple, but it does require a bit more of stamping and cutting out the masking pieces to achieve the final overall look.


If you look closer to the background image, then I am sure you are wondering what Designer Series Paper (DSP) that is? Well, it isn’t paper but hand drawn lines using all three colors of the Daffodil Delight Blendabilities. Before you get overwhelmed, this technique was simple. It does require a ruler and the use of the grid paper made it doable. You can start by using either the darkest or lightest shade. Start drawing your lines moving down the same amount of space for the next line. This is an idea you can use for any card if you don’t have just the right colored DSP for layering. 

Lastly, I was so excited to use the new Painted Petals stamp set (#137146 OC) and Painted Blooms DSP (#137784 OC). Again, I wanted to do a simple card and then for the final project a vintage inspired card. First, the simple card, this was just a matter of using the beautiful DSP paper and layering it for the background. For the sentiment stamped area, the saying is included. The flowers were done by stamping the stems and then coloring the three flowers individually with the same color markers as the DSP. 
Simple! 

This leads me to my last card. Again, using the Painted Petals stamp set, plus the new Butterflies Thinlits Dies (#137360 OC), the Artisan Embellishment Kit (#137909 OC), the new Sahara Sand 7/8” Lace Trim (#137866), and the Tea Lace Paper Doilies (#129399 AC).  I started by layering the different flower stamps available in the set with different colored inks and then I added in the stems. The fun thing about this idea is that you can add a little or a lot depending upon your feelings at the time. Afterwards, I cut out the image with the Label Collection Framelit die and sponged around the edges a bit. I layered the doily on a base layer of the Wisteria Wonder (sponged edge and free hand drawn stitches) wrapping the lace trim over the doily and finally adding the stamped flowered image on top.


Using the Artisan kit, I added some buttons, a single fabric flower and a touch of the purple felt ribbon on the lace trim. The butterfly was sponged with Perfect Plum and Gold inks then placed on the card.  I know this card was a stretch for me, but having Janice Rosenthal-Rock as your upline manager her love of flowers and vintage was bound to influence me at some point. 


After all of this was said and done, I realized that I totally missed another card that we did. Yep, a total of six (6) projects were completed this month. I have one more card to show you using the Lotus Blossom stamp set  (#139143 SAB), but I think when I finished this month’s swap cards I must have included my workshop sample in my bunch. So, I will send out an updated blog posting with that card later.

As for the FREE SAB products listed here and in the catalog, there is still time to place a qualifying order and earn free items. Sale-a-Bration ends March 31st

Please contact me, if you want to know more about these any other products discussed in this post or to come to one of my Saturday workshops.

Dates for my next workshops are:
May 16th – Projects: Sheltering Tree as cards and Mixed Media
July 18th
September 12th
November 21st

Tuesday, January 27, 2015

Celebrations!

And that was the theme for the cards we created at my first Saturday Stampers group of 2015! As stated in my last post I stopped holding my monthly Mojo Monday groups and went to an every other month group at my house. I wasn't sure how it would work, but I loved it. I felt so comfortable and at ease in my own setting, plus knowing if I forgot something, I just had to run up stairs and retrieve it. The ladies didn't have to worry about rushing to get home after work too. I thinking this may work. 

Starting with using the Celebrate Today stamp set, the Birthday Bash DSP, and the Balloon Framelits Dies we created two fun cards for birthdays. The first card was a combination and CASE from a card of Shelly Roberts, thrown in with a card Jen Arkfold had created. The fun of a good CASE card is making it your own. The second cards was inspired by Justin Krieger, I liked how he used the vellum paper for the balloons so you can look through them and see the fun DSP paper. It is hard to see but the Happy Birthday is in gold ink and the DSP also has some balloon in gold. Okay you can see one of the gold balloons in the upper right hand corner. 


The next cards are more Birthday Celebrations. Using the FREE Big Day stamp set; wait did I say free (?), why, yes I did, because it is Sale-a-Bration time (SAB), more on that later…..Using the Big Day set, we created 2 different cards. The first one was done using Memento black ink and then coloring in the letters for some fun, on white for a tag. The top of the tag was finished using the Scallop Tag Topper, new in this years Annual Catalog. Then layering Birthday Bash DSP and some Washi tape (not sure what catalog the tape was from but it is the green with arrows) on Hello Honey, Black and Old Olive card stock . On the inside we stamped the cute sentiment of adding a little ice cream….I like ice cream with my cake, do you?


Still using the Big Day stamp set and this time we used a couple new products; Chalkboard Paper and ColorBox Chalk Ink. “Chalkboard” is so in right now and this is a fun way to use it. We stamped the celebrate your day image with the Yellow chalk ink on the chalkboard paper. To give it a bit more texture, we used clear embossing powder over the top.  The ribbon at the top is Hello Honey Stitched Satin ribbon (I love the feel of this ribbon; it reminds me of the top of a baby’s blanket). The banners behind the chalkboard paper were cut from the Moonlight Designer Series Paper Stacks – would that be DSPS? – I like these 4-1/2 x 6-1/2 papers stacks, they give you a good selection of the same color palate while allowing the you to choice whatever papers strikes your fancy. I love to see everyone’s choices once they add them to their cards. The hearts stamped in the background was from an old set (don’t even know the name) I just liked the added color and I guess I <3 (heart) cake! Inside again used some Washi tape and stamped the cake on a platter in Hello Honey. 


Okay, back to our projects and moving away from cake. This next stamp set is sooooo fun. With the popularity of everyone giving gift cards now, SU really out did themselves. The B.Y.O.P (Buy Your Own Present) has sayings that are suited for birthdays, graduation, thanking someone, baby, wedding and a general one for any occasion. 
I took my creativeness from Chris Slogar’s file card sample and then used the Birthday Bash DSP for my color inspiration. If you look closely you can see some gold confetti flakes in this paper. To highlight the gold flakes, I use our Gold Sequin Trim ribbon and for more fun added the new Pom Pom Trim. I created a tag for the B.Y.O.P. stamp and used the Scallop Tag Topper again for the tag, then colored in the letters. On the inside I created a pocket to place your gift card in, with the stamped image explaining that they get to buy their own present. Are you wondering how we created this file card? Well, by using the SU envelope punch board, yes you can make your own envelopes as well as these fun file cards. 


Finally, next month is February, I had to do one Valentine’s Day card. My trick was to prepare a card without purchasing any new stamps. It is not that I don’t like any of the new stamps; I just knew I won’t reuse them later on. So, I pulled out my Label Card Thinlet set and it has the I (heart) u cut out, perfect.  But that wasn’t enough; I started looking around and grabbed the Chevron punch, the Heart from the Itty Bitty Accents Punch Pack and the new What’s Up punch. While I was looking around, I found the Be Mine stamp in the A Round Array set that was just enough to bring this all together. I think it worked. 


More about the FREE Big Day stamp set and SAB. Once a year when the new Occasion mini catalog comes out SU likes to reward their customers with FREE products. How do you get these items, for every $50 you spend, and that can be from the annual or mini catalog. The SAB products available to you are stamp sets, ribbon and button accessory packs, DSP, Project Life products, and added this year are Blendabilities Markers, the selection is wonderful. 

Please contact me, if you want to know more about these FREE items or any other products discussed in this blog or to come to one of my Saturday classes.
Dates for my classes are:
March 14th – Theme: Blooming
May 16th
July 18th
September 12th
November 21st


Thank you for stopping by and I hope you have some wonderful Celebrations this month too!