Sunday, January 13, 2013

Happy New Year!


My dilemma today was either to post all the workshops I didn’t post at the end of last year – or to start fresh with January’s workshops???? Guess you figured out what I went with…yup starting fresh and will catch up my missed posts within the next couple of weeks. Yes, you will see Halloween pages, Christmas tags and more out of sequence…oh well.


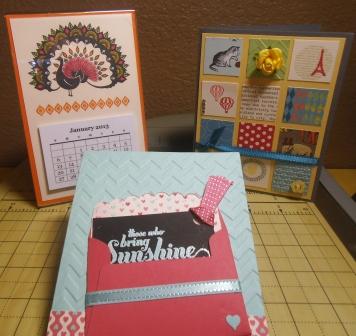
For the first Mojo Monday workshop we had to do a calendar. I wanted to do something simple but colorful. So, I used the fun Peacock from the World Treasures set and stamped it on vanilla card stock, then colored it with SU markers. With backing the vanilla with Pumpkin Pie card stock, that’s where the colorful comes in. The image is slipped into a magnetic photo frame and the monthly calendar is attached to the outside for ease of flipping to the next month. I think this will be a great calendar to place on your refrigerator, desk, or your craft area. Maybe I should have highlighted the next Mojo Monday on everyone’s calendars.

The next two cards were made using a couple of stamp sets from the new Spring Mini Catalog.

The first one uses the Collage Curios stamp set and I thought collage…hmm, a collection, assortment, mixture, and hodgepodge of sorts, so I mixed up this card with a collage of DSP papers. The papers used are Storytime, World Spectacular, First Edition, and Polka Dot Parade. This card could be used for various occasions; birthday, friendship, thank you and so on. So, I did not stamp a sentiment inside the card. Instead, I used the new Talking Tags stickers. They are an exciting new product that allows you to record a message and attach it to your project. You get 10 stickers for less than $8.00 and the app is free to download to your smartphone. How cool is that?! Your own personalized message on your handmade card!

Our last card is a bit of a Valentine card but could be used for a friend too. Maybe it is all the males at my house, but I just didn’t feel like doing a lot of lovey-dovey heart cards, go figure.  This card uses the Feels Good stamp set, the More Amore DSP and the cute little Scallop Envelope Big Shot die. The coordinating card stock is Pool Party, Primrose Petals and Black. Added embellishments are Sycamore Street ¼” ribbon, Pool Party and Primrose Petal Stitched 3/8” ribbon, and Pool Party embossing powder.

Thanks for stopping by, see you real soon.

Friday, November 16, 2012

So much happening at Stampin Up!


Hang on to your hats there is so much going on with Stampin’ Up, that I had to number them for you:

1.    Talking Tags – Personalize cards, invitations, gifts…..

2.    Make an Impressions  - Sizzix Texture Boutique Embossing Machine

3.    Online Extravaganza – Super savings November 19th – November 28th

1.   Talking Tags
With Talking Tag, you can send a gift that is uniquely you. Talking Tag is a message label you can attach to cards, invitations, gifts . . . anything! Personalize birthday cards, Christmas gifts or even record quick instructions for a project. Now your pictures really can say a thousand words!
How to Buy Talking Tags:
Buy 'em by the sheet! You get 10 tags for just $7.95 (item 129723).
How to record a voice message:
  1. Download the FREE TalkingTagT App on you smartphone from talkingtag.mobi, iTunes® or Google PlayT.
  2. Adhere the message tag to your card or gift.
  3. Open TalkingTagT App and scan the code.
  4. Record your message (recording starts immediately, so make sure you're ready!).

You will have the opportunity to listen, re-record, cancel, or confirm your message after you've completed recording it. Each label allows up to 60 seconds of a greeting, song, or product message.

To play the message, recipients will need to download the app and scan the code.  Messages are saved for two years, so they can listen to it over and over.

Watch the video:


2.   Make an Impressions  - Sizzix Texture Boutique Embossing Machine (so cute)
These are selling out quick and there is only a limited amount!
'Tis the season of giving, and the Texture Boutique makes a wonderful gift for anyone who wants to create their own elegant embossed art. To help you with your gift-giving needs, we're offering a special value bundle that saves you $5.90. If you prefer, you can also purchase the Texture Boutique alone. Looking for stocking stuffers? Pick up some additional embossing folders.

Texture Boutique Bundle
Item 132700
$39.95 (a $45.85 value)

Includes
•Texture Boutique Embossing Machine, 1 Pair of Standard Embossing Pads, 1 Mylar Shim
•Flower Garden Textured Impressions Embossing Folder-Stampin' Up! exclusive
•Stripes Textured Impressions Embossing Folder-Stampin' Up! exclusive

Texture Boutique Embossing Machine
Item 132657
$29.95
Includes
•Texture Boutique Embossing Machine, 1 pair of Standard Embossing Pads, 1 Mylar Shim

3.   Online Extravaganza – see attached flyer for more information
The Online Extravaganza promotion is our biggest online sale of the year! We want to make it easier for you to get sales during a time when lots of people are doing their holiday shopping, but not necessarily holding Stampin' Up! parties. So during these 10 days only, you and your customers can get incredible discounts-up to 50 percent-on some of your favorite products!

In addition, there will be three products 20 percent off for 24-hours only on both the first and last days of Online Extravaganza-our very own doorbusters! Woot! Woot!

All items can be ordered through my on-line Stampin’ Up website: http://www.stampinup.net/esuite/home/katpaws/  and will be shipped directly to you!


Tuesday, October 30, 2012

Monster Mash


Is this an army of green and black monsters?
No it is just my treat boxes filled with candy, that I made for my office staff. Which is good because some of these 'solders' are not in formation. I made some of them to look like Frankenstein and others like vampires.

I hope everyone enjoy them.
Happy Halloween!

Monday, October 29, 2012

October Cards


Triple Layer Gratitude Card

I have seen this style (triple layer) card used a lot recently and thought “oh that is tough to do”. Well, it turns out it is not and I love the effect. Once you cut all the layers of the vanilla stock you simply layer them on top of each other and then begin stamping the images. Before taking them apart, I ran all the layers through the Big Shot using the Perfect Polka Dots Impression embossing folder. I like the dimension and ‘funness’ (yes that is not a real word) of this impression folder. Okay back to the card, after running them through the Big Shot, you separate all the layers and then back them to the second layer color. I used More Mustard for the layer backing stock.  Once the backing color is adhered, I started layering them on the base stock (Chocolate Chip). On the second and third layer I added dimensional to ‘pop-it-up’ a little bit more. The ribbon used for this is Soft Suede,3/8” Taffeta Ribbon. The sentiment and images stamped are from the Day of Gratitude stamp set. This was a new set introduced last year and I was pleased to see it made its way into this year’s Annual Catalog. Colors used for this card were: Cajon Craze, More Mustard, Chocolate Chip and Certainly Celery.  Now that I know it’s an easy technique to do and that delivers such a ‘bang for your buck’, I think I will use it again.


Leaves, Happy Thanksgiving Card

This is pretty much a CASE (Copy And Share Everything) card from Mary Fish. I love the cleanness to this card while it incases the outdoors feeling of Fall. After I used the earth colors in the Gratitude card I wanted something a little crisper and I love the color combo of Rich Razzleberry, Lucky Limeade and Crisp White. I ran the white background stock through the Big Shot with the new Woodgrain Impressions embossing folder. Also used and ‘new’ is the Autumn Accent Bigz Die and coordinating Wonderfall stamp set.  I have found when these two are used together it can be tricky at first. I think that is because we have been so spoiled with SU! new Framelits where you stamp first and then die cut out second. With this combo it is easier (for me) to die cut out all my shapes and then stamp the image afterwards.  Using dimensionals, I layered the stamped leave images on top of the Woodgrain and then added a bow and button (both retired) at the stems. The greeting is from the Teeny Tiny Wishes stamp set and then uses the Word Window punch and the Bitty Banners Framelits layered together. I would say this is a Clean CASE.


Christmas Elf Shoes Card

Okay, now I am thinking do I ever think of my own cards?…..Yes, I know I do, but sometimes I love some that I have found from other talented stampers that I just have to CASE. This Elf Shoes card was from Becky of Inking Idaho (2011) and it was fun to start doing Christmas cards. Christmas seems so far away, but it is less than 2 months from now. I am sure we have a TON of things we are planning, doing and buying in the next 8 weeks…..yikes. The elf shoes are made by cutting a Top Note die in quarters and then using the Ornament and a 3/4 “ circle punch. Once cut/punched, I sponged the edges with black for some shading. The toes are 1/2” circles of the Red Glimmer paper. Bows are the Gumball Green Stitched Satin Ribbon and the legs are DSP. The greeting is from the Seasonal Saying stamp set. You can buy this stamp as a set or a single stamp until January 2nd.. Colors used for this card are Gumball Green, Cherry Cobbler and White.

Thanks for stopping by.

Sunday, October 28, 2012

Stampin' Up! is having a Spooktacular sale!


Yes, for one day only Stampin' Up! is having a Spooktacular sale!
Almost all stamps are 15% off!


BIG NEWS!! Stampin' Up! is doing a one-day Monday ONLY sale on almost all of our stamp sets!

INCLUDES:

  • Background Stamps
  • Personalized name stamps
  • Cookie Press Stamps
  • Single Stamps
DOES NOT INCLUDE:
  • Hostess Sets
  • Bundled Stamp Sets
  • Digital Stamp brush sets

So - check your catalogs . .. now is the time to order! You can place an online order through my Stampin' Up website (see below link) and click on the Stampin' Up box in the upper right corner, or let me know what you want, and I'll place one big order on Monday evening...

 
I am following this idea from my upline Janice and if orders total $150 or more, I will draw a name from all the orders for someone to receive the Hostess benefits!

Order directly:

 
Katrina Benny >^..^< SU Independent Demonstrator

Tuesday, October 2, 2012

October Schedule of events

Wow, October is going to be a Stamp’ede of fun events for me.

October 6th – Bella Vista High School Craft Fair Janice has participated in this Craft Fair off and on for five to six years.  This will be my third year ‘helping’ her – ha, I really just keep her company – but, I truly enjoy the day. This year we are changing it up a bit, so you will definitely want to see the ‘new’ booth. We will be inside the cafeteria again – which is great because rain or shine we will be protected! Make sure to stop by and say hello.
October 8th – Mojo Monday
Even though this is the month of Halloween, we will be moving on to Fall and Christmas projects.

October 13th – Saturday Scrappers (and my brother’s birthday)
As mentioned before, we are done with Summer pages and we will be creating Halloween and Fall pages. So, remember to take a lot of pictures of your favorite pumpkin, witch, or ghoul to fill your pages.

October 20th – Homemade Holiday Event
Janice and I will be teaming up again and hosting a Holiday Stampin’ event. We will be doing five projects based on the Stampin’ Up! Holiday Mini Catalog. One special project we will be doing is the Christmas Ornament on the front cover of the catalog. The cost for this event is only $25! It will be held at the Origin Coffee & Tea, in Rocklin, a non-profit coffee shop resolved to end human sex-trafficking. 

On a side note, a few more special days for me to celebrate in October are:
October 15th – my Wedding Anniversary and October 19th – Lauryn’s Birthday; both very special days in my life.

Oh, and then let’s not forget October 31st – Halloween!

I hope to see everyone come to at least one or all of these fun events!


Tuesday, September 11, 2012

This month’s Monday Mojo had it going on……


We had Daydreams, wonderful Windows and Ghouls complete with treats.
 
For the Friend card, we worked with a new (new to the group) simple technique of inking the Impressions Embossing Folder to achieve an antique effect to the paper. This technique is simple because all you do is ink up with your ink pad (used Baja Breeze) by patting it over one side of the embossing folder; place your paper in the folder, then running it through the Big Shot. You can change the look by having the ink on the convex or concave side of the paper by choosing which side of the folder you add your ink to. Note: this technique does not require a lot of inking; a little pat will do ya.

Next, we stamped various stamps in the “Daydream Medallion” set with Soft Suede and more Baja Breeze on the coordinating Very Vanilla, and yep, Baja Breeze card stock. Then we stamped the sentiment from the “Blessing from Heaven” stamp set. Okay, so you’re thinking simple card if it wasn’t for the cutting of the medallions and sentiment….Nope, we went back to the Big Shot and used the new Apothecary Accents and Floral Frames Framelits to cut out everything so nicely. What a time saver. Do you have these framelits? If not, you need them! Additionally, we added a little bit of the Victoria Crochet Trim ribbon and a cute little (retired) button to top it off. If you don’t have a button that matches, a Jumbo Pearl would go nicely instead.


Staying with new ‘simple’ techniques, the Cottage Window card uses the new “Cottage Window” Stamp set, Core’dinations Card Stock and Stampin’ Sanding System. Okay, here is what the Holiday mini catty says: “Core’dinations Card Stock, 80 lb. sandable card stock to create an antiqued, distressed, colorpopping look. Outside layers are exclusive Stampin’ Up!® colors—one side textured, one side smooth. Inside layer is a monochromatic color. Reveal inside layer by sanding, tearing, or distressing.” I used the wood grain embossing folder on the Early Espresso Core’dinations Card Stock, and then sanded the paper re-reveal the lighter (maybe Crumb Cake?) color beneath.

I stamped the window image with Versa Mark onto Watercolor Paper and embossed it with Early Espresso Stampin’ Powder (new mini catty). I wanted a thicker stock to coordinate with the Core’dinations card stock (wow that’s a lot of ‘core’ going on.) For the ‘outside the window’ image, this set comes with Pumpkins, three coordinating Branches and Birds, and other seasonal images. I chose the barer branch, pumpkin and spider. I then cut out the inside of the window image, raised it with Dimensional, and placed it over my ‘outside the window’ image for a 3-D effect. The extras on this card are: a little bit of Howlstooth & Scaringbone DSP, retired More Mustard ribbon, sentiment, and brad. Oh, and all of these are layered on Crumb Cake card stock.

Lastly, and the most Ghoulish and Googlie-eyed, we completed a couple of simple (not techniques) treats using the Ghoulish Googlies Bundle. It includes the Ghoulish Googlies Designer Kit and “Googly Ghouls” stamp set, again, in the new Holiday mini catty. Just look at what you get with this bundle: 20 2-sided printed tags, 50 googlie-eyes (so fun!), 10 treat bags, baker’s twine, plus the coordinating “Googly Ghouls” stamp set.

I also embossed the treat bags with the Spider Web embossing folder (big catty), stamped a spider image on the tag, tied it with the baker’s twine, adhered it to the bag, and filled it with candy. Spooky simple!

Since the kit comes with 10 additional preprinted tags, I made this cute little “matchbook” treat cover with the extras and some (again coordinating) Howlstooth & Scaringbone DSP. Ghoulishly sweet and simple!


Thank you friend, for stopping bye, looking through my window, with your own googlie eyes.